I mentioned my terrible neglect of this blog already, so I'll try not to beat myself up over that too much. :) However, I do think that anyone still following along must be considered a true friend! In honor of true friends, and just for fun, I decided to do a little giveaway.
It's probably no secret that I go a little crazy with crafty and scrapbooking projects, although most of those projects are posted on my scrap blog rather than here. I make a lot of greeting cards this way, and because many of my projects are creative team assignments, where I get free product in exchange for creating something, I don't always have an immediate use for the finished product.
So, why not share the fun? I'm doing a giveaway for these six cards, including envelopes. The chandelier card is 5"x7" and has a greeting inside: "hanging around with you is so fun!" The other five cards are approximately 4.25"x5.5" and blank inside.
Want to win? Leave a comment on this post by 12:00 pm Pacific time on Saint Nicholas Day (December 6.) You must include an e-mail address so I can contact you for your mailing address. I'll pick a winner that day, and mail the cards by December 10. US and Canada addresses only, please. :) Good luck!
-- Originally posted at: http://rebeccasmiscellanies.blogspot.com/
Showing posts with label Crafty. Show all posts
Wednesday, December 1, 2010
Sunday, August 15, 2010
What I'm scrapping these days
With apologies to those who read my scrapbooking blog, today I'm going to post a couple of recent scrapbook layouts I created. On that blog, however, I try to keep it about the scrapbooking and don't talk a lot about my life, so I thought I'd post here with some more about these pages.
I'm trying to deliberately create some pages that are more autobiographical, basically sort of like journal entries in a way, but creatively presented. The first one is "Note to Self" which is simply a photo of me and a quote I'd been thinking about this week:
I also posted this quote on my Facebook page, and several people wondered if my suitcase was packed and where I was going. But this quote this week wasn't about traveling to another city or country. Instead, it was about taking risks, and doing things that aren't easy for me. I spent a day this week with a friend of a friend who was in town, someone I'd never met except over e-mail, showing them around San Diego. Meeting new people makes me nervous, so it took some risk on my part to do this. The quote is right. I would have regretted not taking advantage of this opportunity.
The next page, "Little Pieces of Me," speaks more for itself, but it's the kind of thing I'd want to post here anyway, it just happens to be in picture form. Special thanks to my friend and fellow scrapper Sarah who created the digital paper strips I used in this layout.
-- Originally posted at: http://rebeccasmiscellanies.blogspot.com/
I'm trying to deliberately create some pages that are more autobiographical, basically sort of like journal entries in a way, but creatively presented. The first one is "Note to Self" which is simply a photo of me and a quote I'd been thinking about this week:
"Twenty years from now, you will be more disappointed by the things that you didn't do than by the ones you did do. So throw off the bowlines. Sail away from the safe harbor. Catch the trade winds in your sails. Explore. Dream. Discover." -- Mark Twain
![]() |
| Credits here: All About Me Pages |
I also posted this quote on my Facebook page, and several people wondered if my suitcase was packed and where I was going. But this quote this week wasn't about traveling to another city or country. Instead, it was about taking risks, and doing things that aren't easy for me. I spent a day this week with a friend of a friend who was in town, someone I'd never met except over e-mail, showing them around San Diego. Meeting new people makes me nervous, so it took some risk on my part to do this. The quote is right. I would have regretted not taking advantage of this opportunity.
The next page, "Little Pieces of Me," speaks more for itself, but it's the kind of thing I'd want to post here anyway, it just happens to be in picture form. Special thanks to my friend and fellow scrapper Sarah who created the digital paper strips I used in this layout.
![]() |
| Credits here: All About Me Pages |
-- Originally posted at: http://rebeccasmiscellanies.blogspot.com/
Friday, August 6, 2010
I can't decide...
If these towels are deliciously adorable... or adorably delicious...
All I know is I have some seriously cute little crafty projects in mind.
And on another note, I'm learning how valuable editing photos can be. Here's the before and after:
-- Originally posted at: http://rebeccasmiscellanies.blogspot.com/
Wednesday, June 23, 2010
Hooded Towel Tutorial
By request! I make these hooded towels as baby gifts for pretty much every new baby at my church, and have made them for lots of other friends and many of my cousins, too. So, here's a step by step guide to how I make these towels, with lots and lots of photos.
YOU WILL NEED:
- 1 regular size bath towel, which should be washed and tumble-dried before you begin.
- 1 regular size hand towel, washed and dried
- I usually remove any labels from the towels.
- thread to match your towels, 1-3 colors depending the towels you pick
- a denim needle for your sewing machine
HELPFUL HINTS:
- You may need bobbins of each color as well, depending on your towel colors.
- All the stitching is straight stitching.
- For every place that I stitch, I start with 5-6 straight stitches, then go backwards 5-6 stitches, then resume to lock the thread. My mom taught me to always do this, it helps to hold the stitching so it doesn't fall out later.
MAKING YOUR PROJECT
1. First, pick out your towels. I usually make them after I know if it's a boy or girl, but I've done some really cute gender-neutral ones, too. (Shopping tips at the end of this post.)
2. Most of the work is in making the hood for the towel. Start with the hand towel, and fold it in half to get to smaller rectangles, then cut the towel in half along the fold line.
You'll only use one-half of the hand towel for this project so save the other half for another hooded towel.
3. Next, fold your half hand towel in half, right sides together, so the cut edge is folded together. Starting at the finished edge of the towel, sew along the cut edge, leaving a 3/4" seam allowance, and stop about 1/2 inch before you reach the folded edge of the towel.
When you get finished, this is what your towel will look like:
4A. Now, I like to make a corner fold on those unfinished edges and pin it like this:
(Look for the differences between the photos above and below to see which corner I'm talking about.)
4B. Now, starting again at the finished edge of the towel, the point near where the pins are, sew along each cut edge to tack it down. This gets a little tricky because you are sewing into a corner, but you don't need to sew all the way to the end, within 1/2" or 1" is fine.
Once you're done with this part, your towel will look like this (outside first, then the inside shown below that):
5. For the next step, you'll want your towel arranged like the photo on the right, so the top forms a triangle, and the edges are parallel. Next you'll sew across the top of the triangle, about 2-3" from the point, like this:
When, finished, it will look like this, you can just see the stitch line running vertically in this photo:
6. Now, fold the triangle over, so it overlaps, like this, and pin it into place:
There is one thing you can't see in this photo, because it's hidden. Remember in step 4B, when you were sewing the cut edges of the towel down, you didn't sew all the way into the corner? When you first fold over this triangle, there will be a little piece of that cut edge visible. Before I took the above photo, I tucked that edge underneath before pinning it in place.
7. Again starting your stitching at the point of the triangle, sew each side of the triangle like this:
Congratulations! When you are finished with this step, the hood is complete, and will look like this (outside):
8. Now you're ready to attach the hood to the bath towel. Find the center of the hood, and the center of the long edge of the bath towel. I mark each with a pin so it's easy to line them up. With both the bath towel and the hood wrong side up, pin the hood on to the hand towel. I usually overlap them about 1" or so, covering the finished edge of the hood with the bath towel. In the first photo below, you can see the center pins, and the amount of overlap. In the second photo, the pieces have been pinned together every 2-3" along the edge.
10. Now you're ready to sew the hood to the towel!
Important: Don't forget to change your thread color and bobbin if needed!
With the same side up as pictured above, I start at the left top of the overlap, and sew the hood on:
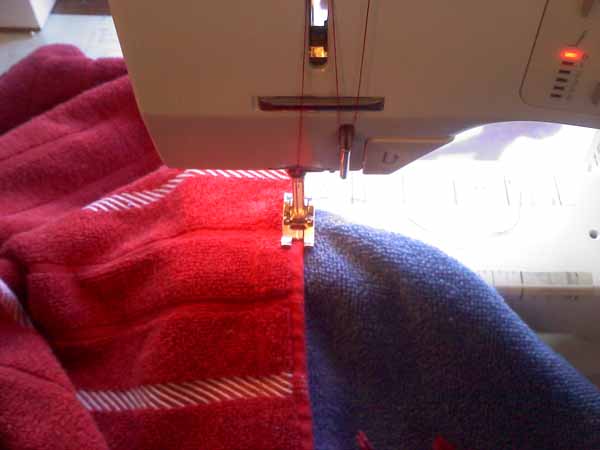
If you have a setting on your machine to leave the needle down when you stop sewing, it will be very useful here. I sew about 1/8" from the edge of the fabric, and when I get to the corner, I stop with the needle down. I lift the foot, turn the fabric 90 degrees (clockwise in the above example), then lower the foot and continue stitching.
When you get done with this step, it will look like this on the front of the towel:
11. Last step! Finish attaching the hood by sewing the side along the edge of the bath towel (the red towel in my photo.) Don't forget to change your thread color and bobbin if needed!
That's it! You're finished!!
MISC (Shopping and other tips!)
- I love to look for cute towels at stores like M*rshalls/TJ M*xx or R*ss, because their prices are very good for cute towels like this, and I can usually find fun embroidered designs for boys and girls. Gender-neutral towels are harder to find, but I've sometimes found yellow duckies.
- You can use a plain towel and embellish it yourself with ricrac or eyelet lace. If you do this, sew the ricrac on to the hood before attaching the hood to the bath towel.
- You can use a washcloth instead of half a hand towel for the hood, the size is a bit different, but it still works great.
- I often will try to use every piece, so on the day I purchased this set, I also was able to find another towel that coordinated with the blue hood. The other half of blue hand towel is plain, but it will go perfectly with the second bath towel, since that is embellished:
- Sometimes I have an embellished hand towel and bath towel, and I've used the remaining hand towel to make two pocket wash cloths, by cutting it in half again, and sewing up the cut edges.
-- Originally posted at: http://rebeccasmiscellanies.blogspot.com/
Friday, March 26, 2010
52:12 Easter Craft
One of the things I enjoy doing in my free time is creative projects. I was inspired by a post on the Make It and Love It blog to make this with my mom, because one of the things that makes creative projects even more fun is working on them with someone else. :)
--
Originally posted at: http://rebeccasmiscellanies.blogspot.com/
Wednesday, May 27, 2009
Sewing Project: Drawstring Bag
Recently, I've been spending a lot of time at D*sneyland. When I go someplace like that, I just can't stand carrying a purse, it's got to be a backpack so my hands are free. So for a while, I've been using this simple bag where the draw strings are also the backpack straps.
I'm not by any means a super seamstress, but I've started following a few blogs for sewing tips, and have been loving the tutorials and free ideas at Stardust Shoes. When I saw this post, an idea was born to use one of her techniques on my bag, so I bookmarked her tutorial on Reverse Applique.
Fast forward to this weekend, and I have some time to "play" with the sewing machine. Keep in mind that when I "play" it is not without the making of many mistakes, so there was some seam-ripping involved when I had to fix a few things. Remember, no pattern was involved, so I occasional sewed part of it together only to realize that I should have completed another step first... and therefore spent some quality time with the seam ripper.
I dug through my stash of fabrics and found some fun patriotic prints to use for the accents on the bag, and this is the result. This first photo shows the bag laid flat. You can see the basic rectangle shape. Rather than stitch together pieces of denim to make the right size, I used the legs of the old jeans, including the existing seams.
So what about that great reverse applique idea I raved about? My camera isn't the best at close-up shots, but here's a tidbit of the design:
And finally, here's the front of the bag with the full design, and also folded over to show the coordinating fabric I used to line the bag:
Yes, I know. I'm officially M*ckey crazy. But isn't it cute?? Can't wait for my next trip to the happiest place on earth.
--
Originally posted at: http://rebeccasmiscellanies.blogspot.com/
Thursday, March 26, 2009
Thankful Thursday: Time to Chill
Last weekend, I was ready to bang my head against the wall. It was Saturday, and I was trying my hardest to work ahead and study for a Tuesday test. Who knew it was possible to study before the last minute? So I'm diligently working my way through the review material and things are going fine until I meet problem number 4 in chapter 5. Solving this problem requires use of a concept I have seen before, so I quickly work the problem to arrive at ... the wrong answer. I think I know what went wrong, so I erase like crazy and try again. And again. And AGAIN. Seriously? Still wrong?!!?
I find myself in a resentful state of mind: if I'm going to spend my Saturday night doing homework, it would be nice if I at least accomplish something. Because I can think of a LOT of other things I would rather be doing.
After several failed attempts with no greater insight into the cause of the wrong answer, I give up. I turn to something that calms my mind and helps me relax: I spend time creating. This is a dangerous alternative, as anyone who creates anything knows, because creating something wonderful can be difficult. The desired effect can be elusive. But I risk it because I just can't deal with my calculator anymore. Luckily, odds were in favor of success in this pursuit: I decided to make some homemade greeting cards, and I was already in possession of some fabulous raw materials.
There is satisfaction in overcoming a challenge and arriving at that "aha" moment when everything comes together. There is intrinsic reward in working hard. But sometimes, I crave more immediate success. Sometimes I need to accomplish something without relying on the resources within every last brain cell. Sometimes, it's nice to start something you know you can finish well.
I didn't get any more homework done on Saturday night, but the cards I made became birthday gifts at our family party on Sunday. Best of all, I went to bed relaxed and satisfied with my accomplishments. Later, a friend from class was able to enlighten me and point out the very basic mistake in my calculations, thereby putting me back on track to being prepared for Tuesday. And the detour wasn't so bad either.

--
Originally posted at: http://rebeccasmiscellanies.blogspot.com/
I find myself in a resentful state of mind: if I'm going to spend my Saturday night doing homework, it would be nice if I at least accomplish something. Because I can think of a LOT of other things I would rather be doing.
After several failed attempts with no greater insight into the cause of the wrong answer, I give up. I turn to something that calms my mind and helps me relax: I spend time creating. This is a dangerous alternative, as anyone who creates anything knows, because creating something wonderful can be difficult. The desired effect can be elusive. But I risk it because I just can't deal with my calculator anymore. Luckily, odds were in favor of success in this pursuit: I decided to make some homemade greeting cards, and I was already in possession of some fabulous raw materials.
There is satisfaction in overcoming a challenge and arriving at that "aha" moment when everything comes together. There is intrinsic reward in working hard. But sometimes, I crave more immediate success. Sometimes I need to accomplish something without relying on the resources within every last brain cell. Sometimes, it's nice to start something you know you can finish well.
--
Originally posted at: http://rebeccasmiscellanies.blogspot.com/
Tuesday, August 26, 2008
Great Gift Wrap Idea
If there is one thing in this world I will probably never run out of, it is greeting cards and scrapbook paper. I don't know what possesses me when I am in the stationery section of the store, I am seduced by the beautiful color graphics and colors, and usually something comes home with me. On my last trip, I managed to bring home only four sheets of scrapbook paper, but they are for a specific project, I promise.
So anyway, I have all this scrapbook paper and I've been using it up quite a lot lately by re-purposing it into gift wrap. A 12x12 sheet is the perfect size to wrap a small gift, and these gifts always get comments about how pretty they are. So I thought I'd share my idea just in case there are any other paper-holics out there.
The trick is to place your item diagonally on the scrapbook paper, and fold each corner over on the back.
Then I take a strip of a contrasting paper to make a band around the package, add an embellishment or gift tag, and it's done. For this one, I used paper punches and layered the shapes, drawing the first letter of the recipient's name on the top one, monogram style. This little package contains a men's t-shirt, carefully folded. Since it's for a guy, it's rather masculine, but the gifts I've wrapped for girlfriends are much prettier.
----- * ----- * -----
8/29/08
I just did another one of these, and it falls into the cutesy category, so I thought I'd add it.
So anyway, I have all this scrapbook paper and I've been using it up quite a lot lately by re-purposing it into gift wrap. A 12x12 sheet is the perfect size to wrap a small gift, and these gifts always get comments about how pretty they are. So I thought I'd share my idea just in case there are any other paper-holics out there.The trick is to place your item diagonally on the scrapbook paper, and fold each corner over on the back.
----- * ----- * -----
8/29/08
I just did another one of these, and it falls into the cutesy category, so I thought I'd add it.
Subscribe to:
Posts (Atom)