
By request! I make these hooded towels as baby gifts for pretty much every new baby at my church, and have made them for lots of other friends and many of my cousins, too. So, here's a step by step guide to how I make these towels, with lots and lots of photos.
YOU WILL NEED:
- 1 regular size bath towel, which should be washed and tumble-dried before you begin.
- 1 regular size hand towel, washed and dried
- I usually remove any labels from the towels.
- thread to match your towels, 1-3 colors depending the towels you pick
- a denim needle for your sewing machine
HELPFUL HINTS:
- You may need bobbins of each color as well, depending on your towel colors.
- All the stitching is straight stitching.
- For every place that I stitch, I start with 5-6 straight stitches, then go backwards 5-6 stitches, then resume to lock the thread. My mom taught me to always do this, it helps to hold the stitching so it doesn't fall out later.
MAKING YOUR PROJECT
1. First, pick out your towels. I usually make them after I know if it's a boy or girl, but I've done some really cute gender-neutral ones, too. (Shopping tips at the end of this post.)

2. Most of the work is in making the hood for the towel. Start with the hand towel, and fold it in half to get to smaller rectangles, then cut the towel in half along the fold line.

You'll only use one-half of the hand towel for this project so save the other half for another hooded towel.
3. Next, fold your half hand towel in half, right sides together, so the cut edge is folded together. Starting at the finished edge of the towel, sew along the cut edge, leaving a 3/4" seam allowance, and stop about 1/2 inch before you reach the folded edge of the towel.

When you get finished, this is what your towel will look like:


4A. Now, I like to make a corner fold on those unfinished edges and pin it like this:
(Look for the differences between the photos above and below to see which corner I'm talking about.)

4B. Now, starting again at the finished edge of the towel, the point near where the pins are, sew along each cut edge to tack it down. This gets a little tricky because you are sewing into a corner, but you don't need to sew all the way to the end, within 1/2" or 1" is fine.

Once you're done with this part, your towel will look like this (outside first, then the inside shown below that):


5. For the next step, you'll want your towel arranged like the photo on the right, so the top forms a triangle, and the edges are parallel. Next you'll sew across the top of the triangle, about 2-3" from the point, like this:

When, finished, it will look like this, you can just see the stitch line running vertically in this photo:

6. Now, fold the triangle over, so it overlaps, like this, and pin it into place:

There is one thing you can't see in this photo, because it's hidden. Remember in step 4B, when you were sewing the cut edges of the towel down, you didn't sew all the way into the corner? When you first fold over this triangle, there will be a little piece of that cut edge visible. Before I took the above photo, I tucked that edge underneath before pinning it in place.
7. Again starting your stitching at the point of the triangle, sew each side of the triangle like this:

Congratulations! When you are finished with this step, the hood is complete, and will look like this (outside):

8. Now you're ready to attach the hood to the bath towel. Find the center of the hood, and the center of the long edge of the bath towel. I mark each with a pin so it's easy to line them up. With both the bath towel and the hood wrong side up, pin the hood on to the hand towel. I usually overlap them about 1" or so, covering the finished edge of the hood with the bath towel. In the first photo below, you can see the center pins, and the amount of overlap. In the second photo, the pieces have been pinned together every 2-3" along the edge.


10. Now you're ready to sew the hood to the towel!
Important: Don't forget to change your thread color and bobbin if needed!
With the same side up as pictured above, I start at the left top of the overlap, and sew the hood on:

If you have a setting on your machine to leave the needle down when you stop sewing, it will be very useful here. I sew about 1/8" from the edge of the fabric, and when I get to the corner, I stop with the needle down. I lift the foot, turn the fabric 90 degrees (clockwise in the above example), then lower the foot and continue stitching.
When you get done with this step, it will look like this on the front of the towel:

11. Last step! Finish attaching the hood by sewing the side along the edge of the bath towel (the red towel in my photo.) Don't forget to change your thread color and bobbin if needed!
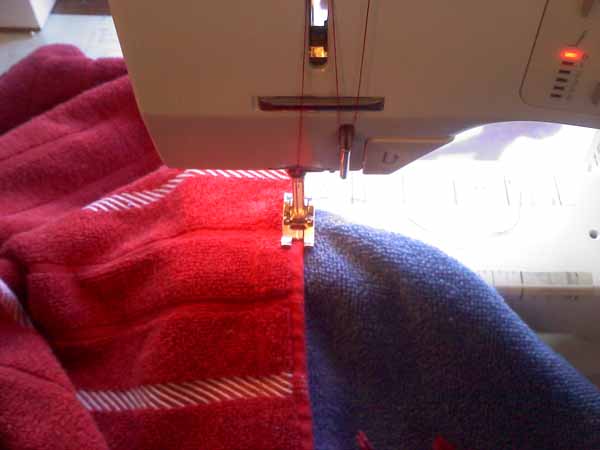
That's it! You're finished!!

MISC (Shopping and other tips!)
- I love to look for cute towels at stores like M*rshalls/TJ M*xx or R*ss, because their prices are very good for cute towels like this, and I can usually find fun embroidered designs for boys and girls. Gender-neutral towels are harder to find, but I've sometimes found yellow duckies.
- You can use a plain towel and embellish it yourself with ricrac or eyelet lace. If you do this, sew the ricrac on to the hood before attaching the hood to the bath towel.
- You can use a washcloth instead of half a hand towel for the hood, the size is a bit different, but it still works great.
- I often will try to use every piece, so on the day I purchased this set, I also was able to find another towel that coordinated with the blue hood. The other half of blue hand towel is plain, but it will go perfectly with the second bath towel, since that is embellished:

- Sometimes I have an embellished hand towel and bath towel, and I've used the remaining hand towel to make two pocket wash cloths, by cutting it in half again, and sewing up the cut edges.
-- Originally posted at: http://rebeccasmiscellanies.blogspot.com/
No comments:
Post a Comment